About This Recipe
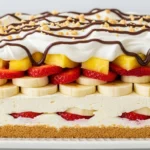
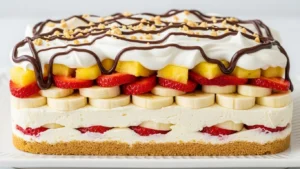
No bake banana split cake takes everything you love about a classic banana split—bananas, pineapple, strawberries, whipped cream, chocolate, and cherries—and turns it into an easy layered dessert in a pan.
It’s:
- Cool, creamy, and refreshing
- A total crowd‑pleaser for potlucks and birthdays
- Completely oven‑free and make‑ahead friendly
This no bake banana split dessert features:
- A buttery graham cracker crust
- Light, silky cream cheese layer
- Fresh bananas, crushed pineapple, and strawberries
- Fluffy whipped topping, nuts, and chocolate drizzle
Ingredients: What You’ll Need
For the No Bake Crust
- 200 g graham cracker crumbs or digestive biscuit crumbs (about 2 cups)
- 115 g unsalted butter, melted (½ cup)
- 50 g granulated sugar (¼ cup, optional for sweeter crust)
- 1 pinch fine sea salt
For the Cream Cheese Layer
- 450 g full‑fat cream cheese, softened (16 oz)
- 150–180 g powdered sugar, sifted (1¼–1½ cups, to taste)
- 1 tsp pure vanilla extract
- 240 ml cold heavy whipping cream (1 cup), whipped to stiff peaks
- OR 240–300 ml (8–10 oz) thawed whipped topping
For the Fruit & Topping Layers
- 3–4 ripe but firm bananas, sliced
- 1 can (about 560 g / 20 oz) crushed pineapple, well drained
- 300–350 g strawberries, hulled and chopped (about 2–2½ cups)
- OR 1 can strawberry pie filling for a sweeter, saucier layer
- 480–720 ml whipped topping (2–3 cups) for the top layer
- 60 g chopped nuts (½ cup – walnuts, pecans, or peanuts)
- Chocolate syrup or hot fudge sauce, for drizzling
- Maraschino cherries, well drained, for garnish
Pan & Tools
- 23×33 cm (9×13 inch) baking dish
- Mixing bowls
- Electric mixer (hand or stand)
- Rubber spatula
Instructions: Step‑By‑Step Preparation
- Make the Crust
- In a bowl, stir together:
- Graham cracker crumbs
- Melted butter
- Sugar (if using)
- Pinch of salt
- Mix until evenly moistened and the mixture resembles wet sand.
- In a bowl, stir together:
- Press the Crust
- Pour crumbs into a 9×13 inch dish.
- Press firmly into an even layer using:
- Clean hands or
- The bottom of a measuring cup or glass.
- Refrigerate while you prepare the filling (at least 15 minutes).
- Make the Cream Cheese Layer
- In a large bowl, beat softened cream cheese until very smooth (2–3 minutes).
- Add powdered sugar and vanilla; beat until creamy and lump‑free.
- In a separate chilled bowl, whip heavy cream to stiff peaks (or use thawed whipped topping).
- Gently fold the whipped cream into the cream cheese mixture until fully combined and fluffy.
- Spread the Cream Cheese Mixture
- Spread the cream cheese layer evenly over the chilled crust.
- Smooth the top with a spatula.
- Chill for 10–15 minutes to help it firm slightly.
- Add the Fruit Layers
- Bananas:
- Slice bananas just before layering to minimize browning.
- Optional: lightly toss slices in a little lemon juice and blot dry.
- Arrange banana slices in a single layer over the cream cheese mixture.
- Pineapple:
- Make sure crushed pineapple is very well drained (press with a spoon in a sieve).
- Sprinkle evenly over the banana layer.
- Strawberries:
- Scatter chopped fresh strawberries evenly over the pineapple
- OR spoon strawberry pie filling in an even layer.
- Bananas:
- Add Whipped Topping & Garnishes
- Spread a generous layer of whipped topping over the fruit, sealing all the way to the edges.
- Sprinkle chopped nuts on top.
- Drizzle with chocolate syrup or fudge in thin lines.
- Decorate with maraschino cherries.
- Chill to Set
- Cover the dish with plastic wrap.
- Refrigerate for at least 4 hours, ideally overnight, to allow the layers to set and flavors to meld.
- Serve
- Slice into squares with a sharp knife.
- Use a spatula to lift out each serving, keeping all the pretty layers intact.
How to Store It
- Refrigerator
- Cover tightly and store for 2–3 days.
- Bananas will gradually soften and may darken; it’s best in the first 24–36 hours.
- Tips
- If making more than a day ahead, consider adding bananas closer to serving time.
Smart Ingredient Swaps
- Gluten‑Free Version
- Use gluten‑free graham crackers or cookies for the crust.
- Lighter Version
- Use reduced‑fat cream cheese (not fat‑free).
- Use less powdered sugar and light whipped topping.
- Dairy‑Free Option
- Use dairy‑free cream cheese.
- Swap heavy cream/whipped topping for whipped coconut cream.
- Use vegan butter in the crust.
- Flavor Twists
- Use an Oreo or chocolate cookie crust for extra richness.
- Add a thin layer of chocolate pudding between the cream cheese and fruit for a “banana split sundae” feel.
How to Serve It

Serve no bake banana split cake:
- Chilled, straight from the fridge, cut into squares
- With extra toppings on the side:
- Extra chocolate or caramel drizzle
- Extra nuts
- Fresh sliced strawberries
Great for:
- Summer BBQs and picnics
- Birthday parties and potlucks
- Easter or Mother’s Day brunch tables
Cultural Background & Personal Touches
Banana split desserts originated as an ice cream parlor treat in the early 1900s and evolved into all sorts of fun spins—cakes, pies, and layered “lush” desserts.
This no bake banana split cake keeps that:
- Playful, nostalgic ice cream parlor vibe
- Colorful layers and classic toppings
…but turns it into an easy pan dessert that:
- Travels well
- Feeds a crowd
- Requires no baking at all
I like to keep the fruit fresh (bananas, pineapple, strawberries) and let the whipped cream and chocolate bring in the “sundae” feeling.
Seasonal Variations
- Summer:
- Add extra fresh berries (blueberries, raspberries) on top.
- Fall:
- Use caramel drizzle and toasted pecans instead of chocolate syrup and peanuts.
- Winter / Holidays:
- Use an Oreo crust and top with red and green sprinkles.
- Spring:
- Add extra strawberries and a touch of lemon zest in the cream cheese layer.
Tried & Tested Feedback
From party guests and family:
- “Tastes exactly like a banana split, but even creamier.”
- “The perfect cold dessert for hot days.”
- “Everyone went back for seconds—there were no leftovers.”
Freezer-Friendly Version
This dessert can be frozen with some caveats:
- Bananas may change texture and darken; best to:
- Freeze without bananas and add fresh ones after thawing, or
- Accept a slightly softer texture.
To Freeze:
- Assemble without bananas, wrap tightly, and freeze up to 1 month.
- Thaw overnight in the fridge.
- Add fresh banana slices and final toppings just before serving.
Frequently Asked Questions
Will the bananas turn brown?
They can over time. To slow browning:
- Slice right before layering
- Lightly coat in lemon juice and blot dry
- Serve within 24–36 hours for best appearance
Can I use whipped topping instead of heavy cream?
Yes. It’s classic for this type of dessert and very convenient. Use about 8–10 oz for the cream cheese layer and 2–3 cups for the top.
Can I make this the day before a party?
Yes—this dessert is ideal to make the night before. Just keep it well covered in the fridge.
Can I halve the recipe?
Yes. Make it in an 8×8 inch (20×20 cm) pan and reduce all ingredients by half.
Final Thoughts
No bake banana split cake is one of those nostalgic, “wow” desserts that looks impressive but is incredibly simple. With its buttery crust, fluffy cream cheese layer, fresh fruit, and sundae‑style toppings, it’s a guaranteed hit for warm‑weather gatherings and family celebrations.

No Bake Banana Split Cake (Layered, Creamy & Perfect for Parties)
Description
A fun, layered no bake banana split cake with a graham cracker crust, creamy vanilla‑peanut butter–free cream cheese layer, bananas, pineapple, strawberries, whipped topping, nuts, and chocolate drizzle. All the flavors of a banana split, no oven required.
Ingredients
Instructions
- Stir together crumbs, melted butter, sugar, and salt until evenly moistened. Press firmly into a 9×13 inch dish. Chill while preparing filling.
- Beat cream cheese until smooth. Add powdered sugar and vanilla; beat until creamy.
- Whip heavy cream to stiff peaks and fold into the cream cheese mixture until light and fluffy (or fold in whipped topping).
- Spread cream cheese mixture evenly over chilled crust. Chill 10–15 minutes.
- Layer sliced bananas over cream cheese, then sprinkle on well‑drained crushed pineapple, then chopped strawberries or strawberry pie filling.
- Spread whipped topping over fruit in an even layer.
- Sprinkle with nuts, drizzle with chocolate syrup, and garnish with cherries.
- Cover and refrigerate at least 4 hours, preferably overnight, before slicing and serving.
Notes
- Best served within 1–2 days for freshest bananas.
To reduce browning, lightly coat banana slices with lemon juice and blot dry before layering.
For a richer dessert, use an Oreo or chocolate cookie crust.
For easier serving, chill well and use a sharp knife and wide spatula to lift pieces.