About This Recipe
This brownie mug cake is your answer to a fast, fudgy chocolate fix with almost no dishes and no oven required.
- Texture & flavor:
- Gooey, fudgy center (if you don’t overcook it)
- Crackly, brownie-like top
- Deep chocolate flavor with melty chocolate chips
- Why you’ll love it:
- Ready in 5 minutes, start to finish
- Made in one mug, no mixing bowls
- Uses pantry ingredients you probably already have
- Perfect for late-night cravings, study sessions, or small households
It’s basically a single-serve brownie baked right in your mug—soft, rich, and dangerously easy.
Ingredients: What You’ll Need
For 1 large mug cake (or 2 small ones):
- 3 tbsp all-purpose flour
- 3 tbsp granulated sugar
- 2 tbsp unsweetened cocoa powder
- Pinch of salt
- 2 tbsp neutral oil (canola, vegetable, or light olive)
- or melted butter, cooled slightly
- 3 tbsp milk (any)
- ¼ tsp vanilla extract
- 2 tbsp chocolate chips or chopped chocolate
- Optional:
- 1–2 tbsp brown sugar (for extra fudgy texture)
- Pinch of instant espresso powder (boosts chocolate flavor)
Equipment:
- 1 microwave-safe mug, 10–12 oz (300–350 ml) capacity
Instructions: Step-by-Step Preparation
- Choose the Right Mug
- Use a microwave-safe mug that holds at least 10–12 oz.
- The batter will rise, so don’t use a small espresso cup.
- Mix Dry Ingredients in the Mug
- Add to the mug:
- Flour
- Sugar
- Cocoa powder
- Salt
- (Brown sugar + espresso powder if using)
- Stir with a fork or small whisk until well combined and no cocoa lumps remain.
- Add to the mug:
- Add Wet Ingredients
- Add:
- Oil
- Milk
- Vanilla extract
- Stir until you have a smooth, thick batter with no dry pockets at the bottom or corners.
- Add:
- Add Chocolate Chips
- Fold in chocolate chips, reserving a few for the top.
- Sprinkle the remaining chips on top of the batter.
- Microwave
- Microwave on HIGH for 45–75 seconds, depending on your microwave (800–1000 W).
- Start with 45–50 seconds.
- Check: center should look set around the edges but slightly soft in the very middle.
- If needed, add 10-second bursts, checking after each.
- Remember: it will keep cooking from residual heat; don’t overdo it if you want it fudgy.
- Microwave on HIGH for 45–75 seconds, depending on your microwave (800–1000 W).
- Cool Briefly & Serve
- Let the brownie mug cake cool for 3–5 minutes (it’s very hot straight from the microwave).
- Eat directly from the mug with a spoon.
How to Store It
This brownie mug cake is best eaten immediately.
- If you must save it:
- Cool completely, cover the mug, and store at room temperature for up to 1 day.
- Reheat for 10–15 seconds in the microwave (but texture is always best fresh).
Smart Ingredient Swaps
- Dairy-free:
- Use plant-based milk (almond, oat, soy) and oil (not butter).
- Lower sugar:
- Use 2 tbsp sugar instead of 3; texture will be a bit less gooey.
- Extra rich:
- Replace 1 tbsp flour with 1 tbsp almond flour.
- Gluten-free:
- Use a 1:1 gluten-free flour blend designed for baking.
- Egg-free on purpose:
- This recipe is already eggless on purpose to avoid a rubbery texture in the microwave.
How to Serve It
- Straight up:
- Warm, with a spoon, right from the mug.
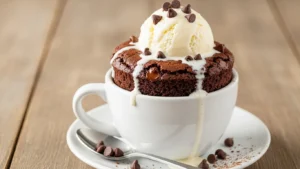
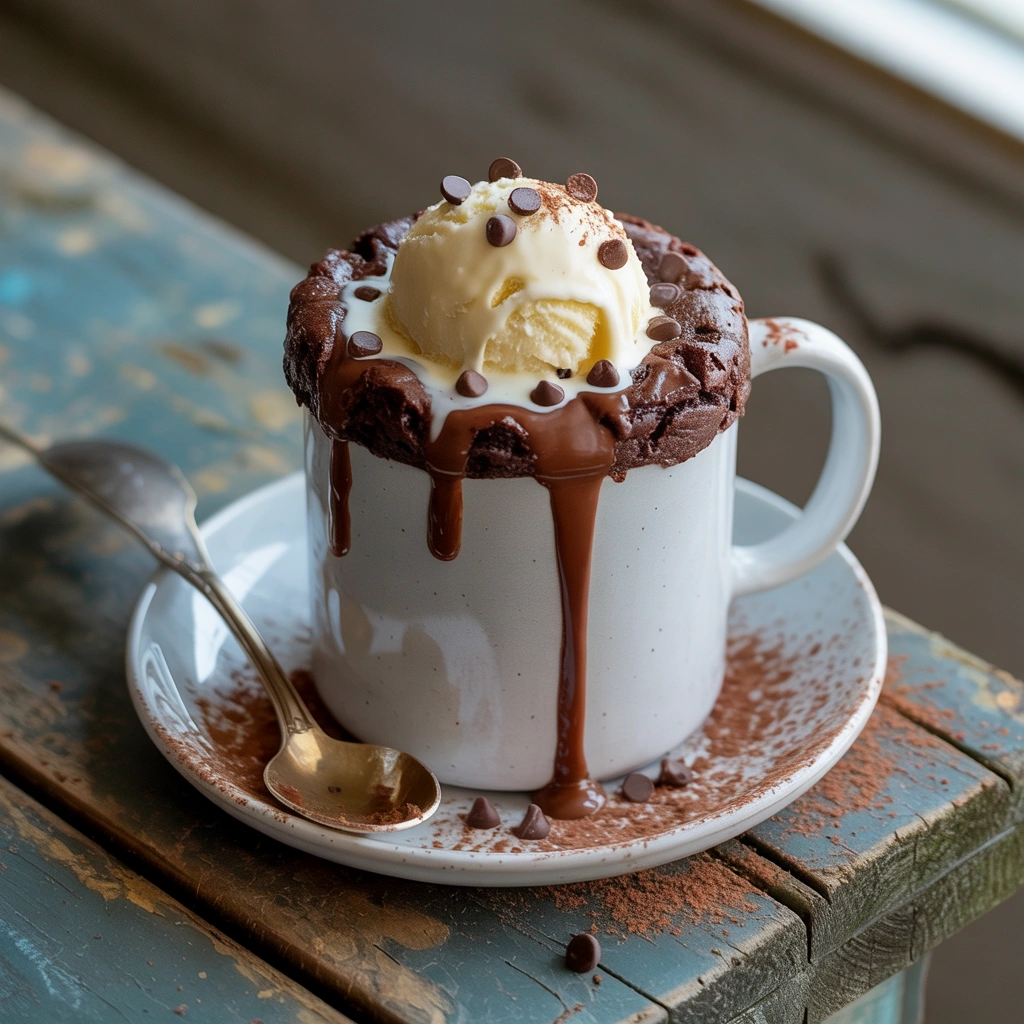
- Extra indulgent:
- Top with:
- A scoop of vanilla ice cream
- Whipped cream
- A drizzle of chocolate or caramel sauce
- Top with:
- Fun additions:
- Sprinkle with sea salt flakes
- Add a spoonful of peanut butter or Nutella in the center before microwaving for a molten surprise.
Cultural Background & Personal Touches
Mug cakes became popular in the early 2010s as microwaveable, single-serve desserts shared on blogs and social media—perfect for:
- Dorm rooms
- Offices
- Late-night kitchen experiments
This brownie mug cake version:
- Skips the egg (so it doesn’t turn spongy or rubbery)
- Keeps the ingredient list short and simple
- Focuses on that fudgy brownie texture rather than a light cake crumb
It’s my go-to when I want a brownie, don’t want a whole pan in the house, and don’t want to wait 30+ minutes.
Seasonal Variations
- Fall:
- Add a pinch of cinnamon and nutmeg.
- Top with a little pumpkin spice whipped cream.
- Winter:
- Stir in a splash of peppermint extract.
- Crumble a candy cane on top.
- Spring:
- Serve with fresh berries and a spoonful of yogurt or whipped cream.
- Summer:
- Top with ice cream and some chopped strawberries or cherries.
Tried & Tested Feedback
From repeat tasters:
- “Best late-night dessert—tastes like a real brownie.”
- “Love that it’s egg-free; texture is fudgy, not rubbery.”
- “Dangerously easy. I’ve made it three nights in a row.”
Freezer-Friendly Version
This specific mug cake isn’t ideal for freezing once cooked, but you can prep a dry mix:
- Mix several portions of the dry ingredients (flour, sugar, cocoa, salt) in small jars or bags.
- When craving hits:
- Dump one portion into a mug
- Add milk, oil, vanilla, and chips
- Stir and microwave
This gives you a “DIY mug brownie mix” ready to go.
Frequently Asked Questions
Why no egg?
- A whole egg is too much for a single mug cake and makes it rubbery in the microwave. This recipe is intentionally eggless for a fudgier texture.
Why is my mug cake dry?
- Most likely:
- Overcooked (microwaved too long)
- Too much flour (scoop lightly or use measuring spoons)
- Next time, cook in shorter bursts and stop when the center is just set.
Can I double the recipe?
- Yes, but use two separate mugs and microwave them one at a time for even cooking.
What size mug works best?
- A 10–12 oz (300–350 ml) mug gives the batter room to rise without overflowing.
Final Thoughts
This brownie mug cake is the kind of recipe you memorize: quick, satisfying, and always there when you want a warm, fudgy chocolate dessert without turning on the oven. Keep the ingredients on hand, and you’re never more than a few minutes away from dessert.

Brownie Mug Cake (Single-Serve, Microwave Brownie in a Mug)
Description
A rich, fudgy brownie mug cake made in the microwave in about a minute. Single-serve, eggless, and perfect for late-night chocolate cravings or when you want dessert for one without turning on the oven.
Ingredients
Instructions
- In a 10–12 oz microwave-safe mug, mix flour, sugar, cocoa powder, salt, and optional brown sugar/espresso powder until well combined.
- Add oil, milk, and vanilla. Stir until you have a smooth, thick batter with no dry patches at the bottom.
- Fold in chocolate chips, reserving a few for the top. Sprinkle remaining chips over the batter.
- Microwave on HIGH for 45–75 seconds, depending on your microwave. Start with 45–50 seconds and add 10-second increments as needed. The center should look just set but still soft.
- Let cool 3–5 minutes (it will be very hot), then enjoy straight from the mug.
Notes
- Do not overcook or the brownie will be dry; it continues to cook a bit after microwaving.
For a gooier center, slightly underbake and eat warm.
Top with ice cream, whipped cream, or a drizzle of chocolate or caramel sauce for extra indulgence.
To make a DIY mix, combine dry ingredients in small jars or bags; add wet ingredients and chocolate chips when ready to cook.