About This Recipe
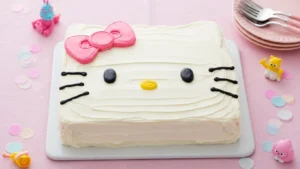
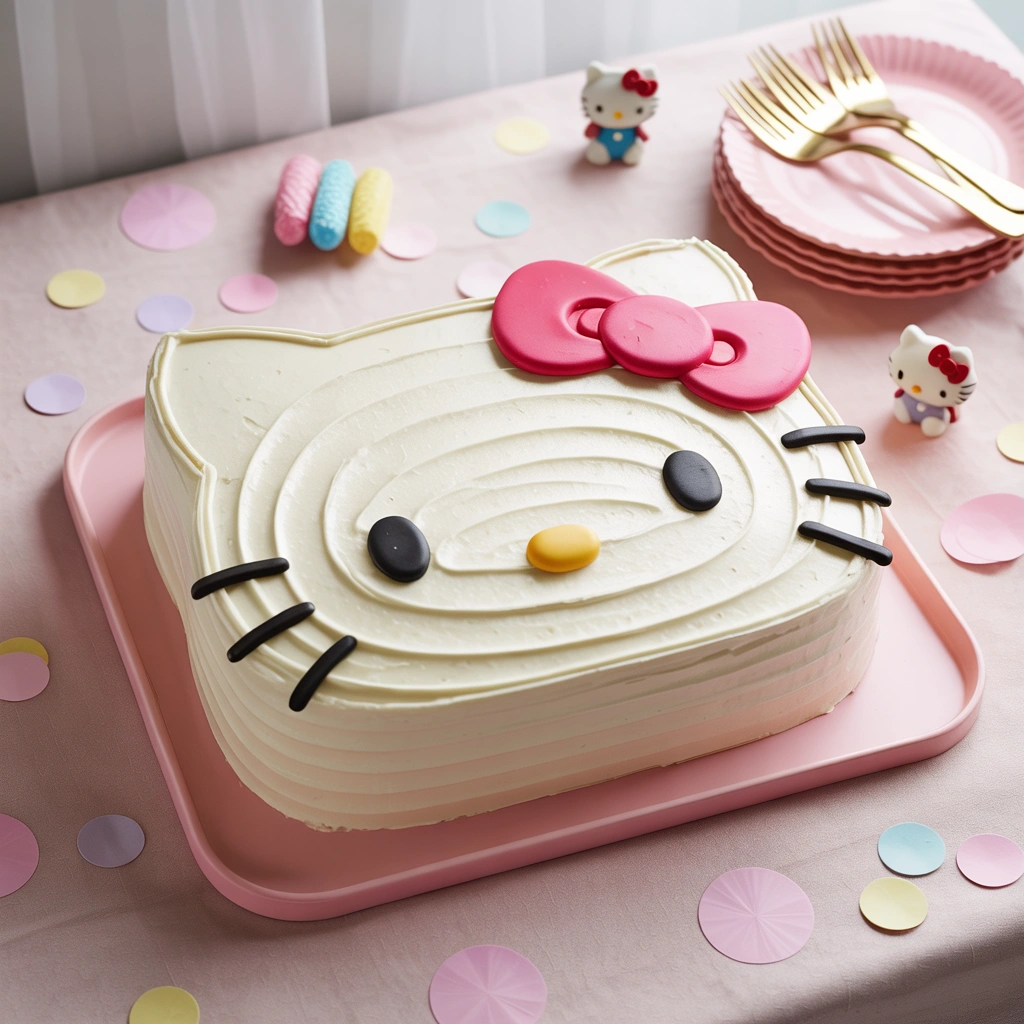
This Hello Kitty cake is a charming, show-stopping centerpiece for any birthday—especially for kids (or grown-ups!) who love this iconic character.
You’ll get:
- A soft, moist vanilla–strawberry sheet cake
- A smooth layer of white vanilla buttercream
- Simple buttercream and fondant decorations to create Hello Kitty’s face and bow
The design looks impressive, but the method is beginner-friendly:
you bake a 9×13 cake, carve very lightly, and decorate right in the pan or on a board.
Ingredients: What You’ll Need
For the Vanilla-Strawberry Sheet Cake (9×13 inch)
- 2½ cups (300 g) all-purpose flour
- 2½ tsp baking powder
- ½ tsp baking soda
- ¾ tsp fine sea salt
- 1¾ cups (350 g) granulated sugar
- ½ cup (115 g) unsalted butter, softened
- ¼ cup (60 ml) neutral oil (canola, vegetable, or light olive)
- 3 large eggs, room temperature
- 2 tsp pure vanilla extract
- 1 cup (240 ml) buttermilk, room temperature
- or 1 cup milk + 1 tbsp lemon juice, rested 5–10 minutes
- ¼ cup (60 g) sour cream or Greek yogurt, room temperature
- ½ cup (120 g) strawberry jam or preserves (for filling, optional)
For the Vanilla Buttercream
- 1½ cups (340 g) unsalted butter, softened
- 4–5 cups (480–600 g) powdered sugar, sifted
- 2–3 tsp vanilla extract
- ¼ tsp fine sea salt
- 3–5 tbsp (45–75 ml) heavy cream or milk
For Decorating the Hello Kitty Face
You can use fondant or colored buttercream / candy melts.
- White buttercream (from above) to cover the cake
- Pink:
- Pink fondant or a small bowl of buttercream tinted with pink gel color (for bow)
- Black:
- Black fondant, or
- Black ready-made decorating icing or candy melts (for eyes, whiskers, outline)
- Yellow:
- Small piece of yellow fondant or a dot of yellow icing (for nose)
- Piping bags + small round tips (or zip-top bags with a tiny corner snipped)
- Toothpicks and a small offset spatula
Instructions: Step-by-Step Preparation
1. Bake the Sheet Cake
- Prep the pan & oven
- Preheat oven to 175°C / 350°F.
- Grease a 9×13-inch (23×33 cm) pan, line the bottom with parchment, and lightly flour the sides.
- Mix dry ingredients
- In a bowl, whisk together:
- Flour
- Baking powder
- Baking soda
- Salt
- In a bowl, whisk together:
- Cream butter, oil & sugar
- In a large bowl, beat butter and sugar until light and fluffy (2–3 minutes).
- Add oil; mix until combined.
- Add eggs & vanilla
- Add eggs one at a time, beating well and scraping down the bowl.
- Mix in vanilla.
- Add buttermilk & sour cream
- In a jug, whisk buttermilk and sour cream.
- Add dry ingredients to the butter mixture in 3 additions, alternating with the buttermilk mixture in 2 additions (start and end with dry).
- Mix on low just until combined; do not overmix.
- Bake
- Pour batter into the prepared pan, and smooth the top.
- Bake 25–32 minutes, until:
- Top springs back lightly
- A toothpick comes out clean or with a few moist crumbs
- Cool completely in the pan on a rack.
- Optional filling
- Once cool, you can:
- Turn the cake out onto a board
- Slice horizontally and spread with strawberry jam, then reassemble
- For beginners, you can skip this step and leave the cake a single layer.
- Once cool, you can:
2. Make the Vanilla Buttercream
- Beat softened butter on medium-high until pale and creamy (2–3 minutes).
- Gradually add powdered sugar and salt, mixing on low until incorporated.
- Add vanilla and 3 tbsp cream/milk.
- Beat on medium-high 3–4 minutes until light and fluffy.
- Adjust consistency:
- Too thick? Add more cream, 1 tbsp at a time.
- Too thin? Add more powdered sugar.
Reserve a small amount of buttercream in two bowls for:
- Pink bow (tint with pink gel color, if not using fondant)
- Any additional details
3. Prepare the Cake for Decorating
- Level if needed
- If the top is domed, trim gently with a serrated knife, so it’s flat.
- Chill
- For easier decorating, chill the cake (still in the pan or on a board) in the fridge for 30–45 minutes.
- Transfer (if desired)
- You can decorate:
- Directly in the 9×13 pan (simple), or
- Turn the cake out onto a large cake board for a cleaner “party table” presentation.
- You can decorate:
4. Create the Hello Kitty Shape (Simple Version)
The easiest way is to keep the cake rectangular and decorate the face inside it, but you can lightly round the corners:
- With a small knife, very slightly round the four corners of the cake to soften the shape.
- Brush away crumbs.
Don’t worry about perfect accuracy—Hello Kitty’s face is simple and forgiving once frosted.
5. Frost the Cake (Crumb Coat + Final Coat)
- Crumb coat
- Spread a thin layer of white buttercream over the entire top (and sides if the cake is out of the pan).
- Chill for 20–30 minutes to set.
- Final coat
- Add a thicker layer of white buttercream.
- Smooth with an offset spatula; the top should look like a clean white “canvas”.
6. Add Hello Kitty’s Features
Use a reference image of Hello Kitty as a guide.
A. Outline the Face (Optional but helpful)
- Using a toothpick, lightly sketch:
- Two small triangular ears on the top corners
- Approximate placement of eyes, nose, and whiskers
B. Eyes & Nose
- Eyes:
- Roll two small ovals of black fondant OR pipe two black ovals with icing/candy melts.
- Place them symmetrically, about halfway down the cake.
- Nose:
- Shape a small yellow oval of fondant or pipe a small dot of yellow icing between the eyes, slightly lower.
C. Whiskers
- Using black fondant “snakes” or black icing:
- Add three whiskers on each side of the face (horizontal lines).
- Keep them relatively thin and even.
D. Bow
- On the top left (from your perspective), create the bow:
Option 1 – Fondant:
- Use pink fondant to form:
- Two bow loops (teardrop shapes)
- A small circle for the center
- Press gently onto the frosting to adhere.
Option 2 – Buttercream:
- Tint a small amount of buttercream pink.
- Pipe:
- Two bow loops and a center circle using a round tip
- Fill in and smooth or pipe ruffled edges for a cute effect.
Optional: Outline the bow with a thin line of black icing for definition.
How to Store It
- Refrigerator:
- Store covered for 3–4 days.
- Bring to room temperature for 20–30 minutes before serving for the best flavor and texture.
- Room temperature (for serving):
- Up to 6–8 hours in a cool room, especially if using only buttercream and no fresh fruit on top.
Smart Ingredient Swaps
- Flavor twist:
- Add ½–1 tsp almond extract to the cake and/or frosting for a bakery-style flavor.
- Chocolate Hello Kitty cake:
- Use your favorite chocolate sheet cake instead of vanilla–strawberry.
- Fondant-free:
- Do all decorations with colored buttercream and candy eyes.
- Gluten-free:
- Use a 1:1 gluten-free flour blend formulated for baking.
How to Serve It
- Cut into neat squares or rectangles, making sure each slice includes part of Hello Kitty’s face or bow.
- Perfect for:
- Birthday parties
- Themed movie nights
- Kids’ sleepovers
Serve with:
- Vanilla or strawberry ice cream
- A small bowl of extra strawberries on the side
Cultural Background & Personal Touches
Hello Kitty has been a beloved character for decades, and a Hello Kitty birthday cake has become a classic themed-party request.
This recipe focuses on:
- A reliable, moist vanilla cake base with a hint of strawberry
- Simple techniques (sheet cake, basic carving, buttercream)
- Accessible decorations that don’t require professional-level piping skills
It’s ideal if you want something special and personalized that you can still make at home.
Seasonal Variations
- Spring:
- Add a thin layer of fresh sliced strawberries under the frosting.
- Summer:
- Fill the cake with strawberry or raspberry jam for a “strawberry shortcake” vibe.
- Fall:
- Use a light spice cake instead of vanilla and keep the Hello Kitty design.
- Winter/Christmas:
- Add a tiny red Santa hat or scarf to Hello Kitty with red and white buttercream.
Tried & Tested Feedback
From families and party testers:
- “Kids immediately recognized Hello Kitty and were so excited.”
- “Cake was moist and not too sweet—parents appreciated it too.”
- “Way easier to decorate than I thought; the sheet-cake method is a win.”
Freezer-Friendly Version
- Cake base:
- Bake and cool completely.
- Wrap the whole (unfrosted) 9×13 cake tightly in plastic + foil.
- Freeze up to 2 months.
- Thaw in the fridge overnight, then at room temp before frosting and decorating.
- Decorated cake:
- Not ideal for freezing; decorations can sweat or smudge when thawing.
Frequently Asked Questions
Do I have to carve the cake into a face shape?
No. You can keep the cake fully rectangular and pipe/draw Hello Kitty’s face inside—still very cute and much easier.
Can I use a boxed cake mix?
Yes. Bake one 9×13 box cake according to package directions and follow the frosting/decorating steps here.
How far ahead can I decorate?
- Best: Decorate the night before or morning of the party.
- Keep covered and chilled; add any fresh fruit just before serving.
What if I’m not good at piping?
- Use fondant cutters or ready-made candy eyes and decorations.
- Toothpick-guided outlines and small round tips make it much easier.
Final Thoughts
This Hello Kitty cake brings together a moist, kid-friendly flavor and a playful, recognizable design. With a simple sheet cake base and easy buttercream + fondant details, you’ll have a birthday centerpiece that looks like it came from a bakery—but tastes and feels homemade.

Hello Kitty Cake (Cute Birthday Strawberry-Vanilla Cake)
Description
A cute Hello Kitty cake made from a moist vanilla–strawberry sheet cake, covered in vanilla buttercream and decorated to look like Hello Kitty’s face. Perfect as a Hello Kitty birthday cake for kids and themed parties.
Ingredients
Notes
- You can decorate directly in the pan for easier transport and serving.
Use gel food coloring for the bow if tinting buttercream.
For a simpler version, keep the cake rectangular and draw Hello Kitty’s face within that shape.
Store covered in the fridge; bring to room temperature before serving.