About This Recipe
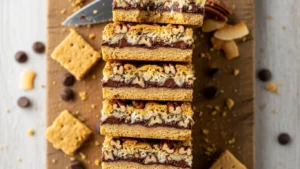
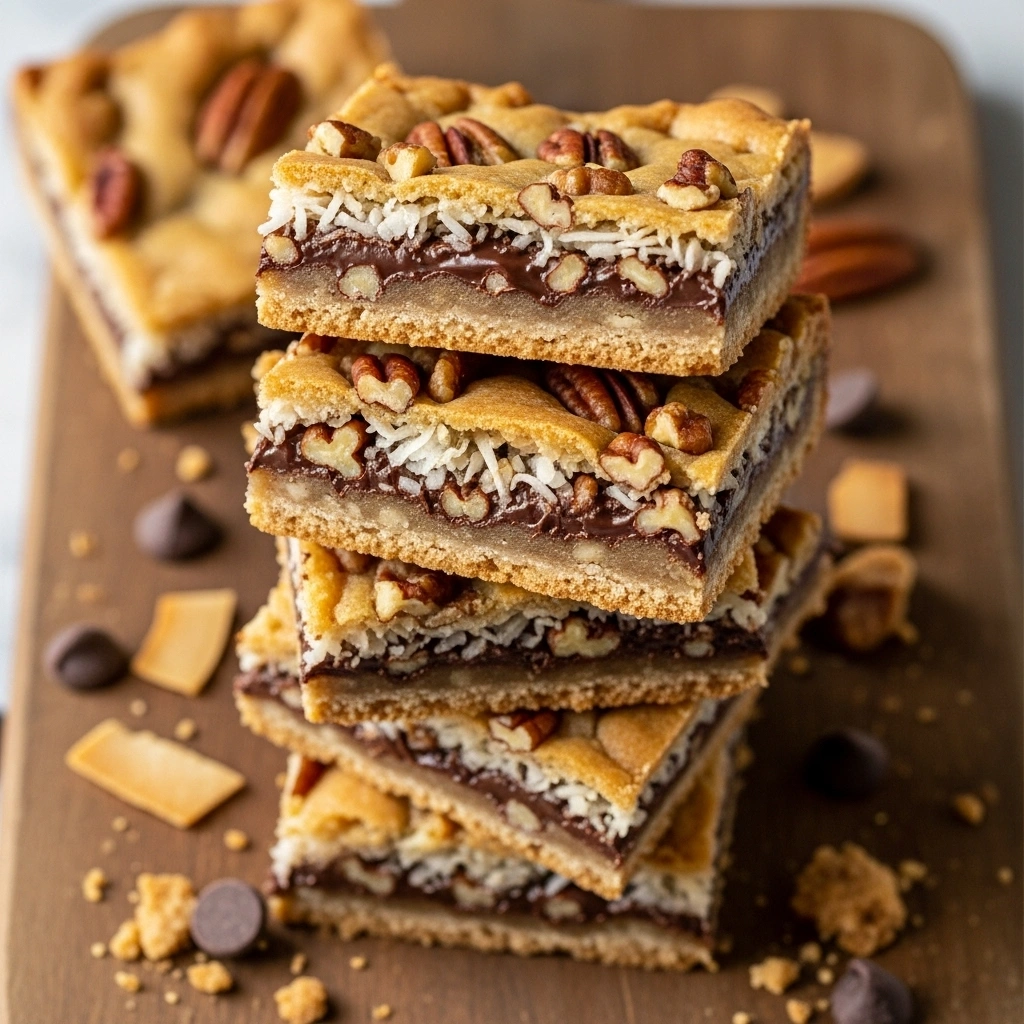
Magic cookie bars—also known as 7-layer bars—are the kind of dessert that practically makes itself:
- A buttery graham cracker crust
- Sweetened condensed milk that turns into a gooey caramel layer
- Chocolate chips, coconut, and nuts melted into one chewy, crunchy bite
They’re:
- Mixed directly in the pan (minimal dishes)
- Great for potlucks, holidays, bake sales, and lunchboxes
- Easy to customize with different chips and mix-ins
- A classic “set-it-and-forget-it” bar cookie
If you need a reliable, everyone-loves-it dessert with almost no effort, this magic cookie bars recipe belongs in your rotation.
Ingredients: What You’ll Need
Base & Toppings
- ½ cup (115 g) unsalted butter, melted
- 1½ cups (150 g) graham cracker crumbs
- About 10–12 full sheets, finely crushed
- ¼ tsp fine sea salt
- 1 can (395 g / 14 oz) sweetened condensed milk
- Not evaporated milk
- 1½ cups (260 g) semi-sweet chocolate chips
- 1 cup (170 g) butterscotch chips (optional, but classic)
- 1½ cups (120 g) sweetened shredded coconut
- 1 cup (115 g) chopped nuts
- Walnuts, pecans, or almonds
Optional Extras
- 1 tsp vanilla extract (stirred into the condensed milk)
- ¼ cup (40 g) mini chocolate chips for sprinkling on top after baking
- Flaky sea salt for finishing
Pan
- 23 x 33 cm (9 x 13 inch) baking pan
- Parchment paper for easy removal (recommended)
Instructions: Step-by-Step Preparation
- Prep the Pan & Oven
- Preheat oven to 175°C.
- Line a 9×13-inch pan with parchment, leaving some overhang on the long sides.
- Lightly grease the parchment and sides of the pan.
- Make the Graham Cracker Crust
- In a bowl, combine:
- Melted butter
- Graham cracker crumbs
- Salt
- Stir until crumbs are evenly moistened and look like wet sand.
- Press mixture firmly into the bottom of the prepared pan, using the bottom of a measuring cup or glass to compact evenly.
- In a bowl, combine:
- Add the Condensed Milk Layer
- Optional: stir vanilla into the sweetened condensed milk.
- Pour sweetened condensed milk evenly over the crust.
- Use a spatula to spread it almost to the edges if needed.
- Layer the Toppings
- Sprinkle evenly over the condensed milk:
- Chocolate chips
- Butterscotch chips (if using)
- Shredded coconut
- Chopped nuts
- Press toppings very lightly with your hands or a spatula to help them adhere.
- Sprinkle evenly over the condensed milk:
- Bake
- Bake at 175°C for 22–28 minutes, until:
- Coconut is golden brown at the edges
- Center is set and bubbly
- If the top browns too quickly, tent loosely with foil for the last few minutes.
- Bake at 175°C for 22–28 minutes, until:
- Cool & Slice
- Remove the pan from the oven and place it on a wire rack.
- Cool completely—this is important so the bars set and slice cleanly.
- Once cool, use the parchment overhang to lift the whole slab from the pan.
- Cut into 16–24 bars, depending on how big you’d like them.
How to Store It
- Room Temperature:
- Store bars in an airtight container for 3–4 days.
- Separate layers with parchment to prevent sticking.
- Refrigerator:
- For firmer bars, store in the fridge up to 1 week; let them sit a few minutes before serving if you prefer softer.
Smart Ingredient Swaps
- Crust options:
- Use digestive biscuits, vanilla wafers, or Oreo crumbs (omit added salt if using salted cookies).
- Nut-free magic bars:
- Omit nuts and add extra chocolate chips, coconut, or crushed pretzels.
- Different chips:
- Try white chocolate, peanut butter chips, or a dark chocolate mix.
- Coconut variation:
- Use unsweetened shredded coconut if you prefer a less-sweet bar.
How to Serve It
- Cut into:
- Larger squares for dessert portions
- Smaller bites for party platters or cookie trays
- Serve:
- At room temperature (chewy and gooey)
- Slightly chilled for a firmer, candy-bar-like bite
- Pair with:
- Coffee or espresso
- Cold milk
- Vanilla ice cream for an over-the-top dessert
They travel well, making them ideal for potlucks, picnics, and holiday cookie exchanges.
Cultural Background & Personal Touches
Magic cookie bars (a.k.a. 7-layer bars, Hello Dolly bars) became popular in mid-20th-century American home baking, especially after recipes appeared on sweetened condensed milk labels. Their “magic” comes from:
- Layers transforming into a cohesive bar with almost no mixing
- Sweetened condensed milk is turning into a caramel-like glue that holds everything together
Personal touches that make this version especially good:
- A pinch of salt in the crust to balance the sweetness
- Optional vanilla in the condensed milk for extra flavor
- Lightly pressing toppings so you get a bar that doesn’t shed all its chocolate and nuts when you pick it up
Seasonal Variations
- Christmas Magic Cookie Bars:
- Use red & green M&M’s, white chocolate chips, and add festive sprinkles.
- Fall / Thanksgiving Bars:
- Add butterscotch chips, pecans, and a pinch of cinnamon in the crust.
- Spring / Easter Bars:
- Use pastel-colored candy-coated chocolates and extra coconut.
- Summer S’mores Bars:
- Add mini marshmallows and use graham crackers + chocolate chunks; drizzle with melted chocolate after baking.
Tried & Tested Feedback
People who make magic cookie bars like these often say:
- They vanish from dessert tables first.
- Everyone asks for the recipe—even though it’s incredibly simple.
- They’re nearly foolproof and perfect for beginner bakers or baking with kids.
Freezer-Friendly Version
- To Freeze:
- Cool bars completely, then cut into squares.
- Place on a baking sheet in a single layer and freeze until solid.
- Transfer to a freezer-safe container with parchment between layers.
- Freeze for up to 2–3 months.
- To Serve:
- Thaw at room temperature or in the fridge.
- They’re excellent chilled from the fridge too.
Frequently Asked Questions
Why are my magic cookie bars too gooey to cut?
- They likely needed more baking time or more cooling time.
- Bake until edges are browned and center is bubbling.
- Let cool completely—chilling briefly in the fridge can help set them.
Can I use evaporated milk instead of sweetened condensed milk?
- No. They’re very different products—evaporated milk is not sweet and won’t set into the same gooey layer.
Do I have to use nuts?
- No. Magic bars are very flexible; just replace nuts with more chips, coconut, or your favorite crunchy add-in.
Can I halve the recipe?
- Yes. Use a 20 x 20 cm (8 x 8 inch) pan and reduce baking time slightly, checking around 18–22 minutes.
Final Thoughts
Magic cookie bars are exactly what the name promises: a little bit of baking magic with almost no effort. Layer, bake, cool, slice—and you’ve got a pan of chewy, gooey, crunchy bars that taste like you spent hours on them.

Classic Magic Cookie Bars (7-Layer Bars – Gooey, Easy & Crowd-Pleasing)
Description
Classic magic cookie bars (7-layer bars) with a buttery graham cracker crust, sweetened condensed milk, chocolate chips, coconut, and nuts. These gooey, chewy bars are incredibly easy to make and always a crowd favorite.
Ingredients
Instructions
- Preheat oven to 175°C. Line a 9×13-inch pan with parchment and lightly grease.
- In a bowl, mix melted butter, graham cracker crumbs, and salt until combined. Press firmly into the bottom of the pan.
- Pour sweetened condensed milk evenly over the crust, spreading gently if needed.
- Sprinkle chocolate chips, butterscotch chips (if using), coconut, and nuts evenly over the top. Press toppings lightly into the condensed milk.
- Bake 22–28 minutes, until coconut is golden and edges are bubbly.
- Cool completely in the pan on a wire rack.
- Lift out using parchment, then cut into bars and serve.
Notes
- For nut-free bars, omit nuts and add extra chocolate or coconut.
Bars slice best when completely cool or slightly chilled.
Store at room temperature for 3–4 days or refrigerate for a firmer texture.
Freeze for up to 3 months; thaw at room temperature before serving.